What is Remote Desktop?
Ads by Webexp EnhancedAd Options

In the case of Windows Server 2008, this service is provided by Terminal Services running on the remote systems and the Remote Desktop Connection (RDC) client on the local system.
Terminal Services run in two different modes, Administration and Virtual Session. Remote Desktop for Administration provides full administration functionality to the remote administrator (including access to the console session and visibility of notification messages). Remote Desktop for Administration is the equivalent to working directly at the remote system's console. In virtual session mode the user is subject to some limitations such as the ability to install applications and view console notification messages.
Windows Server 2008 imposes some administrator logon restrictions. Specifically, a maximum of two administrators may be logged on at any one time, either two logged on remotely, or one local and one remote administrator. This assumes, however, that different accounts are being used to log on. In other words, the same user may not log on locally and remotely simultaneously.
Enabling Remote Desktop Administration on the Remote Server
As mentioned previously, remote desktop functionality on the server is provided by Terminal Services. It is important to note, however, that Terminal Services do not have to be explicitly enabled on the server in order to support Remote Desktop Administration. In fact, all that needs to be done is to enable Remote Desktop Administration. This is configured by opening the Control Panel from the Start menu and selecting the System icon (if the Control Panel is in Control Panel Home mode this is located under System and Maintenance). In the Task section in the top left hand corner of the System page select Remote settings to display the following properties window: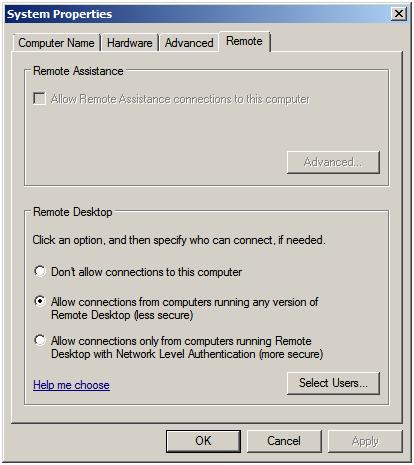
The Remote properties dialog provides a number of options. The default setting is to disallow remote connections to the computer system. The second option allows remote desktop connections from any version of the Remote Desktop client. The third, and most secure option, will only allow connections from Remote Desktop clients with Network Level Authentication support. This typically will only allow access to systems providing secure network authentication such as Windows Vista and Windows Server 2008.
If the Windows Firewall is active, the act of enabling Remote Desktop administration also results in the creation of a firewall exception allowing Remote Desktop Protocol (RDP) traffic to pass through on TCP port 3389. This default port can be changed by changing this setting in the Registry key HKEY_LOCAL_MACHINE\System\CurrentControlSet\Control\TerminalServer\WinStations\RDP-tcp\PortNumber. The easiest way to locate this registry key value is to execute regedit from the Run window or a command prompt, select Edit - > Find and enter RDP-tcp.
Controlling Remote Desktop Access
The default configuration for Remote Desktop is to allow all members of the Administration group to connect remotely. Active Directory also contains a Remote Desktop Users group to which users may be added to provide Remote Desktop access privileges. To provide users with remote desktop access, open the Control Panel -> System and Maintenance -> System -> Remote settings and click on the Select Users button to invoke the Remote Desktop Users dialog illustrated in the following figure: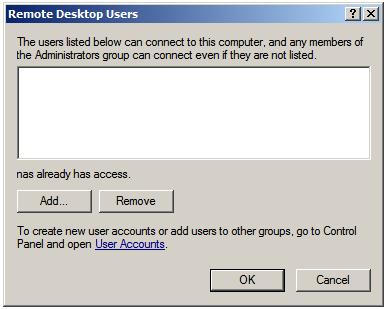
Note that users with administrative privileges do not need to be added to this list; by default they already have Remote Desktop access. To add additional users click on the Add... button to display the Select Users dialog. Enter the name of the user in the text box entitled Enter object names to select and click on Check names to list names that match the name entered. Select the appropriate name from the list. The following example shows user Bill on server winserver-2:

Click on OK to apply the change. The new user will now appear in the list of users with Remote Desktop access on the Remote Users screen. Click OK to close this screen and click on Apply in the System Settings screen. The specified user will now have remote desktop access to the system.
Remote Desktop Group Policy
A vast array of configuration options for Terminal Services is available through the Group Policy settings. To access these values start the Group Policy Object Editor (open the Start menu and enter gpedit.msc into the Search box). In the Group Object Policy Editor navigate to Computer Configuration\Administrative Templates\Windows Components\Terminal Services or User Configuration\Administrative Templates\Windows Components\Terminal Services to access the range of policy settings available.Policy options include, amongst other options, items such as control over resource redirection (printers, audio etc), setting session time limits and security settings. A complete overview of all the settings is beyond the scope of this book but almost without exception the various settings are largely self-explanatory.
Starting the Remote Desktop Client
With the appropriate configuration tasks completed on the remote system the next step is to launch the Remote Desktop Client on the local system. The client can be run in either administration mode which provides full integration with the console of the remote server, or virtual session mode which provides some administrative privileges but does not provide console access or allow applications to be installed.To invoke the Remote Desktop Client in virtual session mode either select Start -> All Programs -> Accessories -> Remote Desktop Connection or enter the following in the Run dialog or at a command prompt:
mstscTo start the Remote Desktop Client in administrator mode run the following command:
mstsc /adminIn either case the following initial screen will appear requesting details of computer to which the client is to connect:
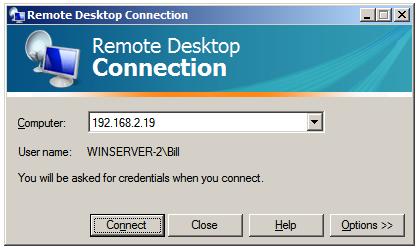
This can either be an IP address or a computer name. If previous connections have been established the User name field will be populated with the user name used in the preceding session. If you need to log in as a different user this option will be provided on the next screen which appears after the Connect button is pressed:
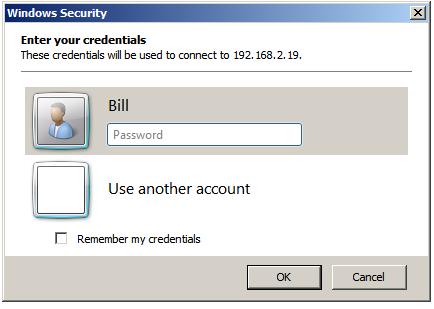
In this screen enter the password for the selected user (note that remote desktop access is only available for user accounts which are password protected). If a user other than the one displayed is required, simply click on the Use another account link and enter the necessary details. Click on OK to establish the connection. After a short delay the remote desktop will appear on the local computer screen.
Remote Desktop Client Configuration Options
The Options>> button displayed on the initial screen of the Remote Desktop Client provides six tabs, each containing a range of configuration options:- General - Allows login credentials to be configured and session information to be saved.
- Display - Configures the resolution and color settings to be used when displaying the remote desktop on the local system.
- Local Resources - Specifies which local resources (sound, disk drives, printers etc) are to be made accessible to the remote system during the Remote Desktop session. This page also provides options to control the situations under which special key combinations such as Ctrl-Alt-Del are interpreted by the local or remote systems.
- Programs - Allows specified programs to be automatically invoked each time a remote sessions is established.
- Experience - Controls which desktop features are enabled or disabled for the Remote Desktop session. For example, over a slow dial-up connection it is unwise to have the desktop background displayed and font smoothing enabled. Either select the connection type and speed to see recommended settings, or use Custom to configure your own settings. This particular screen also provides the option to have the connection automatically re-established in the event that a session is dropped.
- Advanced - Enables and disables remote server verification. This ensures that the remote server to which you are connected is indeed the server you wanted. Also available are TS Gateway settings. By default the Remote Desktop Client is configured to automatically detect TS Gateway settings.
Remote Session Tracking
With Remote Desktop access implemented it is often useful to find out at times who is logged into a system. This can be achieved using the quser command-line tool. To obtain details of logged in users on a local system simply run quser at a command prompt or in a Run dialog:C:Users\Administrator> quser USERNAME SESSIONNAME ID STATE IDLE TIME LOGON TIME administrator 1 Disc 3:18 7/11/2008 12:36 PM bill rdp-tcp#0 2 Active . 7/14/2008 9:11 AM nas console 3 Active none 7/11/2008 12:58 PMTo obtain information for a remote system simply run quser with the /server:<hostname> command-line option. For example:
C:\Users\Administrator> quser /server:winserver-2
 USERNAME              SESSIONNAME        ID  STATE   IDLE TIME  LOGON TIME
 administrator                             1  Disc         3:22  7/11/2008 12:36 PM
 bill                  rdp-tcp#0           2  Active          .  7/14/2008 9:11 AM
 nas                   console             3  Active      none   7/11/2008 12:58 PM
Logging out from a Remote Desktop Session
When the Remote Desktop Client is exited by pressing the 'X' on the control panel the remote session continues to run on the server even though no client is connected. Next time the user connects the desktop session will appear exactly as it was left before.To end the session select Start in the remote desktop session, click on the right arrow button in the bottom right hand corner of the menu and select Log Off. This will close down the remote desktop session and close the remote desktop client.
Running Multiple Remote Desktops
Multiple concurrent remote desktops can be run and managed within a single window using the MMC Remote Desktops snap-in. This may either be snapped into the MMC or launched from the command-line or a Run dialog by typing:tsmmc.mscOnce launched, right click on the Remote desktops item in the tree in the left hand panel and select Add a new connection from the menu. Once selected the Add New Connection dialog will appear as follows:
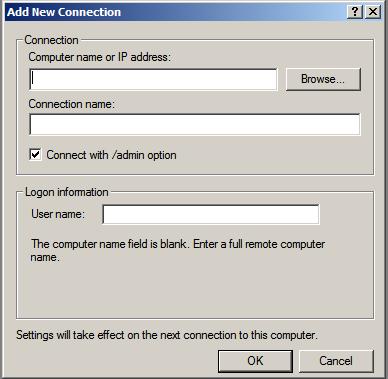
In this dialog enter the IP address or computer name of the remote system together with the User name and the name to be assigned to this connection (this is essentially the name by which this connection will be listed and administered inside the Remote Desktops snap-in). For an administrative session (as opposed to a virtual session) set the Connect with /admin box. Click OK to add the session to the snap-in. Once added, the session will appear in the left hand panel under Remote Desktops. Repeat these steps to add connections to any additional remote systems required.
To establish a remote desktop connection, right click on the name of the session from the left hand panel and select Connect from the menu. The remote session will appear in the window. To start another session simply right click on the session name and once again select Connect. To switch between sessions simply click on the name of the session in the left hand panel and the corresponding desktop will be displayed. The following figure illustrates two sessions running in Remote Desktops:
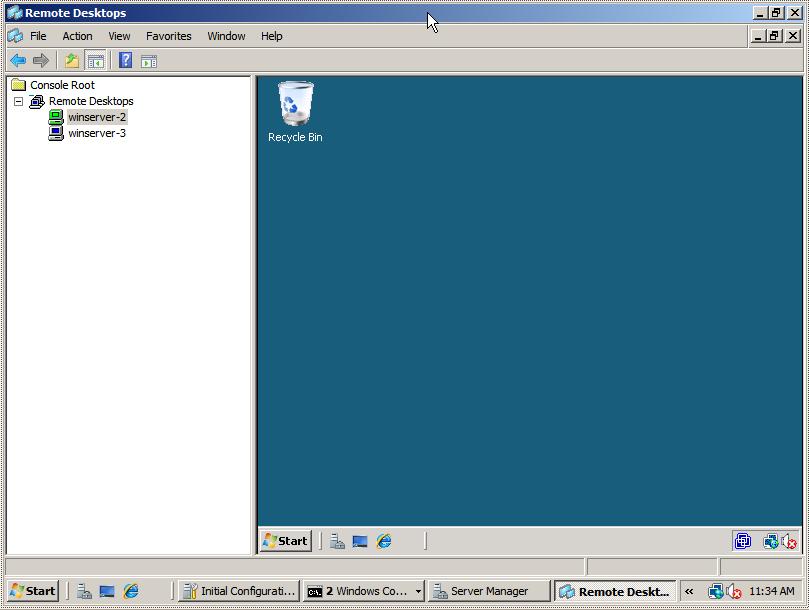
To change configuration options for each session right click on the desired session in the left hand panel and select Properties. This panel has a number of tabs which enable credentials, screen size and program start properties to be defined.


0 komentar:
Posting Komentar